Tuesday, July 30, 2013

Sweden's Model of Sustainability


Sweden's Model of Sustainability
 
 
I came across this article on Facebook and couldn't believe it!
 
50% of U.S. trash ends up in landfills, compared to Sweden -
where only 4% of their trash ends up in landfills.
 
This is just amazing!
 
Here is the link to the article:
 
 
What can the United States (and other countries) be doing to
decrease the amount of trash we produce???


Tuesday, June 18, 2013

Screwing Down the Caps

Next Step:
Screwing Down the Caps


Finally, the mural was at a point where the students
could start screwing down the caps!!

I recommend screwing down the caps 
as opposed to just gluing,
as this makes for a more
permanent installation.

The students loved seeing the foam core boards
placed on the particle wood as they could
 see the design of mural start to come together.

Below are photos of the two halves of the mural 
(the bottom and the top)
with most of the caps screwed down.


We were fortunate that Home Depot donated
the rental of six cordless drills, along with 
chargers and extra batteries. 

Along with the four cordless drills I brought from home, 
there were enough drills for the class to have
one drill per student. 

Just a note: I made sure to go over how to safely use 
the drills with the students.

Home Depot also donated three boxes of drywall screws
with approximately 1,000 screws in each box. 

As noted in the previous post, the main spiral received 
some remedial work. 

Due to a shortage in light blue caps, the spiral
was spray painted to give it a sense of unity.

Here is the photo again: 


Thursday, June 13, 2013

Gluing Down the Caps


The Next Step:
Gluing Down the Caps


Above is a photo of the first board
that had all of its caps glued down. 

This was so fun to see! 

The students loved seeing their work displayed
on the window sills of the art room.

At this stage, they were really starting to 
take pride in their work and in the 
project, in general. 


Above is a photo of two boards matching up. 
Again, the students loved seeing the mural 
starting to come together, one step at a time.

Gluing down the caps provided an opportunity to 

teach about some of the elements and principles of design.

I stressed to my students that in order for the mural to look
more visually interesting, they needed to choose caps 
of different sizes for any given area. 

This way, the caps would create a simulated look of texture

I told my students that if they chose one size of caps for an area, 
that this would look boring. I said to them, "Choose a variety of sizes
so that the mural looks more interesting!" 

They did a great job with this! 


Below is a photo of the mural (work-in-progress)
that was on display for the school's Art Show. 


You can see here how four of the foam core pieces were 
placed together on a larger board.

We used particle board from Home Depot for the larger boards. 
The corner caps were screwed down to the wood
in this photo, just to keep it together. 

Later, all of the caps would be screwed down (next post). 

We were very lucky in that Home Depot donated two large 
pieces of particle board (4' x 8'), 1/2" thick. 
These are priced at $20.00 a piece! 

Home Depot cut the boards down to the size you see above. 
We ended up with six boards cut to this size.

Note that the spiral on the right 
has different shades of blue. Arg!! 

This would be remedied later
to create a sense of unity for the main spiral.

I explained to my students that the main spiral is the central
point of Van Gogh's painting, the emphasis
Thus, it is important that this part of the mural be consistent in color.

It was hard to find enough light blue caps for this project!

Unfortunately, the best remedy I could come up with was
to spray paint the caps once they were all screwed down

Here is the end result: 


Wednesday, June 12, 2013

Painting the Mural


Painting the Mural


The project mentioned here 
will be a plastic bottle cap mural of 
Vincent Van Gogh's "Starry Night." 
(see previous posts). 

Once the design was outlined onto the foam core, 
the students began painting. 

This was the first time I had the design
painted to the surface before gluing down the caps.

I thought this would be best as the mural was big in size
and I wasn't sure if we'd have enough caps 
to cover the whole design. 
Just in case we ran out of caps, the design 
would still carry itself. 

The other reason I had the design painted to the surface first
was to make it easier for the students to know where to put the caps.


The students had a lot of fun choosing boards to paint.
This part of the process really helped the students to gain
individual ownership with the project.

All of the students did a fabulous job painting!
They really became engaged with their work. 
I loved saying to them, "Look at these artists!" 


Below is the mural with the boards put back together on the wall.
This is definitely a work-in-progress photo.

It was nice to see the mural back on the wall to evaluate
the design as a whole.


Below is the same image with the boards
almost entirely painted. 


Next, the gluing down of the plastic bottle caps! 
Stay tuned....

Sunday, June 2, 2013

Choosing Design for Mural


Preparing the Mural for Painting

I love creating a new mural because each mural 
presents itself with new challenges. 
I find the creative process so thrilling!

How big will the mural be?

What is going to be the final design?

What type of surface will the mural be on?

Once these questions are answered, 
the next step is making it happen.

After talking to the principal, I decided we would make 
a pretty big mural - roughly 7' x 7'...the biggest as of yet for me.

I researched different images of Starry Night as I knew
our mural would be the stylized version of the original.
Here are some ideas I found to get the juices flowing:


Then it was a matter of creating our own design.

The class and I discussed colors and different parts of each image
that we liked or dis-liked. 

We finally came up with an outline that we 
could use to project on a surface.

Here is that image:

how to draw starry night step 6

Knowing that this final image would be "tweaked"
according to our needs, I felt okay about copyright.
This image served as a beginning outline just to get
our design ready for painting. 

Then it was a matter of figuring out what surface to put the image on! 
Knowing that I wanted the mural painted first, 
I decided on foam core.

In the past I have outlined the image directly to the wood and 
did not bother to paint at all.

This time, I thought it'd be better for the students to have 
the image painted first and then put down the caps.

Here is the image all laid out on foam core boards, 
enlarged with an overhead projector:


The small boards also make it easier for students
to spread out as they work.

Next step, painting the mural! 

Starting a New Bottle Cap Mural


Starting a New Bottle Cap Mural:
Vincent Van Gogh's 
"Starry Night"


One of my goals this school year was to facilitate the creation of a 
bottle cap mural with some of my students at work.

I chose my 5th grade class to work on this project as it is my
smallest class with only 10 students
(10 very high-energy students)! 

After the students watched several videos and documentaries 
about various environmental issues
 (including Midway Island - see previous post), 
they were pumped to start creating a 
bottle cap mural for the school.

We decided to create Vincent Van Gogh's "Starry Night,"
one of my all-time favorite paintings. 

The first step was sorting by color. 

They loved doing this - they were like little kids in a candy shop 
or like kids sorting their candy after trick-or-treating.
So much enthusiasm!


The next step was to clean all of the caps with lots of soap and water.

Unfortunately, I didn't get any photos of this step. 
Just imagine lots of water - everywhere! 

Note to all art teachers:
 Be very very thankful if you have 
a sink in your room! 

Sunday, February 24, 2013

Midway Island - Plastic Disaster


I came across a video on Facebook today and 
had to post it on my blog immediately. 
This video is about an island in the ocean called 
Midway Atoll or Midway Island.

This island is 2.4 square miles and is roughly 
equidistant between North America and Asia.

Nobody lives on this island, only birds.
The photographs taken show how the
 plastic debris in our oceans create a devastating 
effect on the birds who live on this island.  

It brought tears to my eyes and gave me 
greater conviction to continue creating art
that communicates the severity of the
environmental crisis that plagues our world.

Please watch.

https://www.youtube.com/watch?v=lsJqMmuFWO4


Sunday, February 3, 2013

Artist Re-using Plastic


Oh! It has been too long since I last posted on my blog!
Alas, it is time to start posting again.

I am happy to say that my interest in Eco-art is still alive and well!

I recently came across an article in the magazine, "Art in America" that featured the artist, Aurora Robson. She is an artist that re-uses plastic bottles and transforms them into colorful sculptures. When asked if there are other artists who work with recycled materials that inspire her, she said the following:

"What I'm doing is interrupting the waste stream - so the bottles I use don't really get recycled. What I'm doing is transforming them so they don't even have to go through the environmentally costly recycling process."

I love this! This is how I see my work when I re-use plastic bottle caps.

I also like what Robson says about her role as an artist. She says,
"Part of why I have such a hard time with the role of the artist and with dedicating myself to making art is that I really don't think the planet needs more stuff - even if it's art. I feel more comfortable transforming as opposed to producing. If transformation is part of producing a new piece of artwork, I'm cool with that, but if it's just about mining more materials from our planet to make stuff, I have a really hard time with that."

I couldn't agree more. This just makes so much sense to me. 

It is in this article that I learned more about the natural disaster that Greenpeace calls, 
the "Trash Vortex" or the "Eastern Garbage Patch." 
This is referring to the vast, 100-million ton accumulation of garbage in the
Pacific Ocean - the one that spreads out over a territory the size of Texas. 
This natural disaster has a lot to do with plastic bottles.


This article made me think, "W
hat about the plastic caps that went with those bottles?!"

Discovering this article really gave me extra motivation to get moving
on creating another bottle cap mural. Most likely, this is going to happen
in the context of teaching. My students at school have been collecting
plastic caps since the beginning of the school year. It is time to get started!


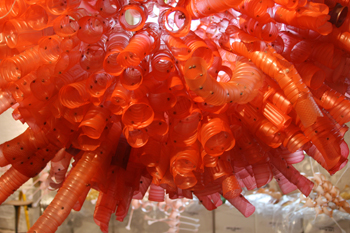
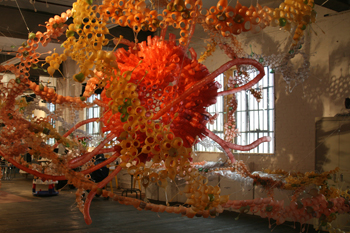
Photos taken from various angles, of the mixed-media sculpture
What Goes Around, Comes Around (2008) by Aurora Robson.
The large-scale work was made from approximately 9000 plastic
bottles that were, as Robson says, "saved from the waste stream."